Advertisement
Food photography with Rupa: Part 2 – Light it Right
21 May 2025 · Education

Natural Light Tips for Irresistible Food Photos
Welcome to the second installment of Food Photography with Rupa, my 7-part series for ckbk users designed to help you elevate your food visuals with confidence using just your phone.
In Part 1, we covered the essential camera settings for food photography, showing you how to set up your phone, clean your lens, lock focus and exposure, and use portrait mode to isolate your hero dish. I recommend starting from the beginning, as each step in this series builds on the one before it.
This time, we’re turning our attention to something I consider a real cornerstone of food photography: light.
Photography Literally Means “Painting With Light”
The word "photography" comes from the Greek phōs (light) and graphé (drawing or painting). So, quite literally, photography is the art of painting with light. And in food photography, the type of light you use can completely transform your image, whether you're shooting a colourful salad, a decadent chocolate cake, or today’s subject: a juicy burger. Incidentally, did you know ckbk has a whole shelf of burger cookbooks, and more than 1500 burger recipes (!).
Great lighting doesn’t require fancy equipment. It requires understanding how light behaves, and how to work with it not against it.

Let’s Talk About Light (and Why Your Kitchen Might Be Holding You Back)
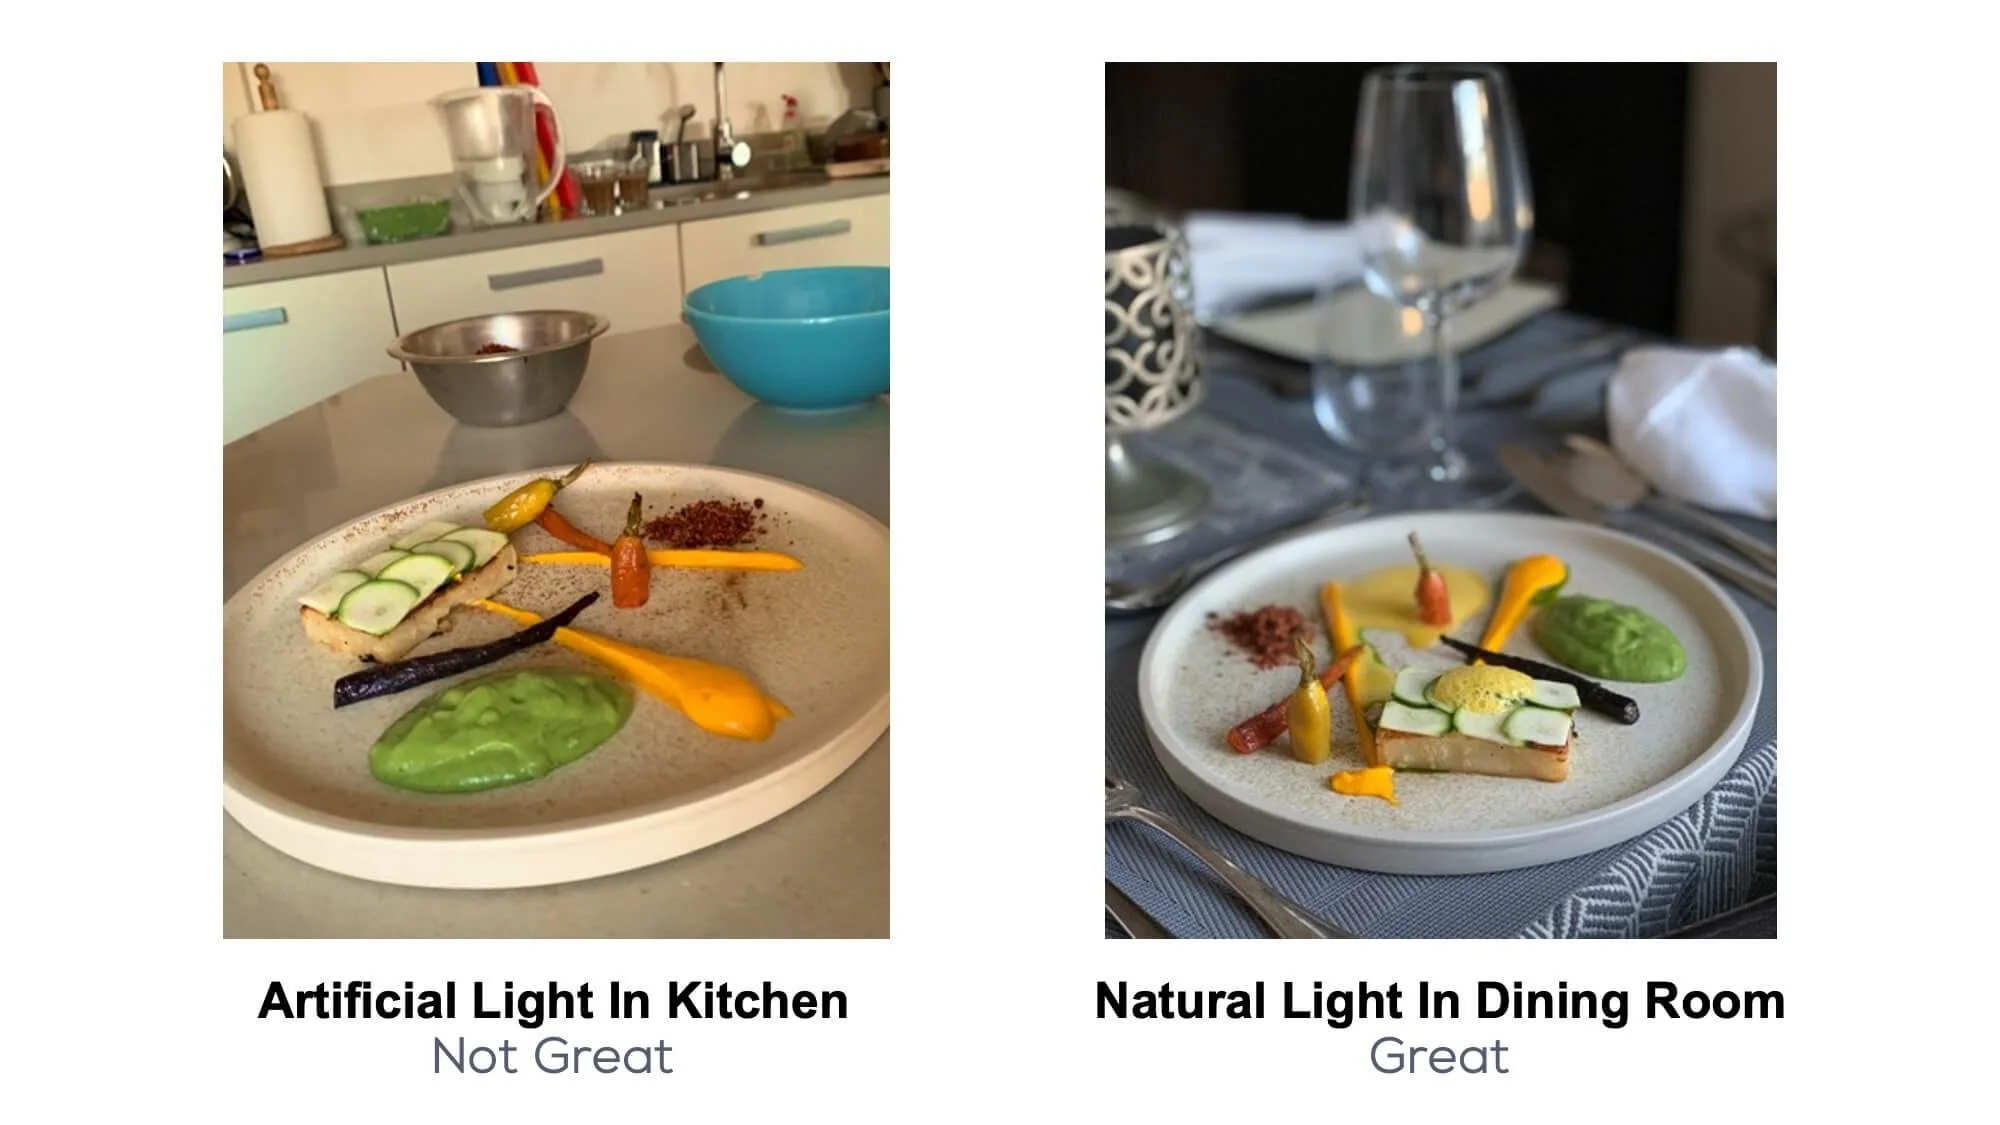
One of the biggest mistakes I see people make is photographing their food in the wrong place. Most of us naturally gravitate to where we plated the dish often the kitchen or dining table. But if the light in that spot isn’t great, your photos will never reach their full potential.
It doesn’t matter how beautiful the dish is if the lighting is off, it won’t look its best on camera.
The trick? Move your food to where the best natural light is. That might be your living room, your hallway, bedroom, yes I have shot a few setups in a few bedrooms during my career!
“The photo doesn’t need to happen where the food is made it needs to happen where the light is best.”
Why Natural Light Wins
Natural light is the easiest, most accessible way to make your food look fresh, vibrant, and true to life. It enhances colours, reveals textures, and creates depth especially important when photographing 3D food like burgers, wraps, or grilled dishes.
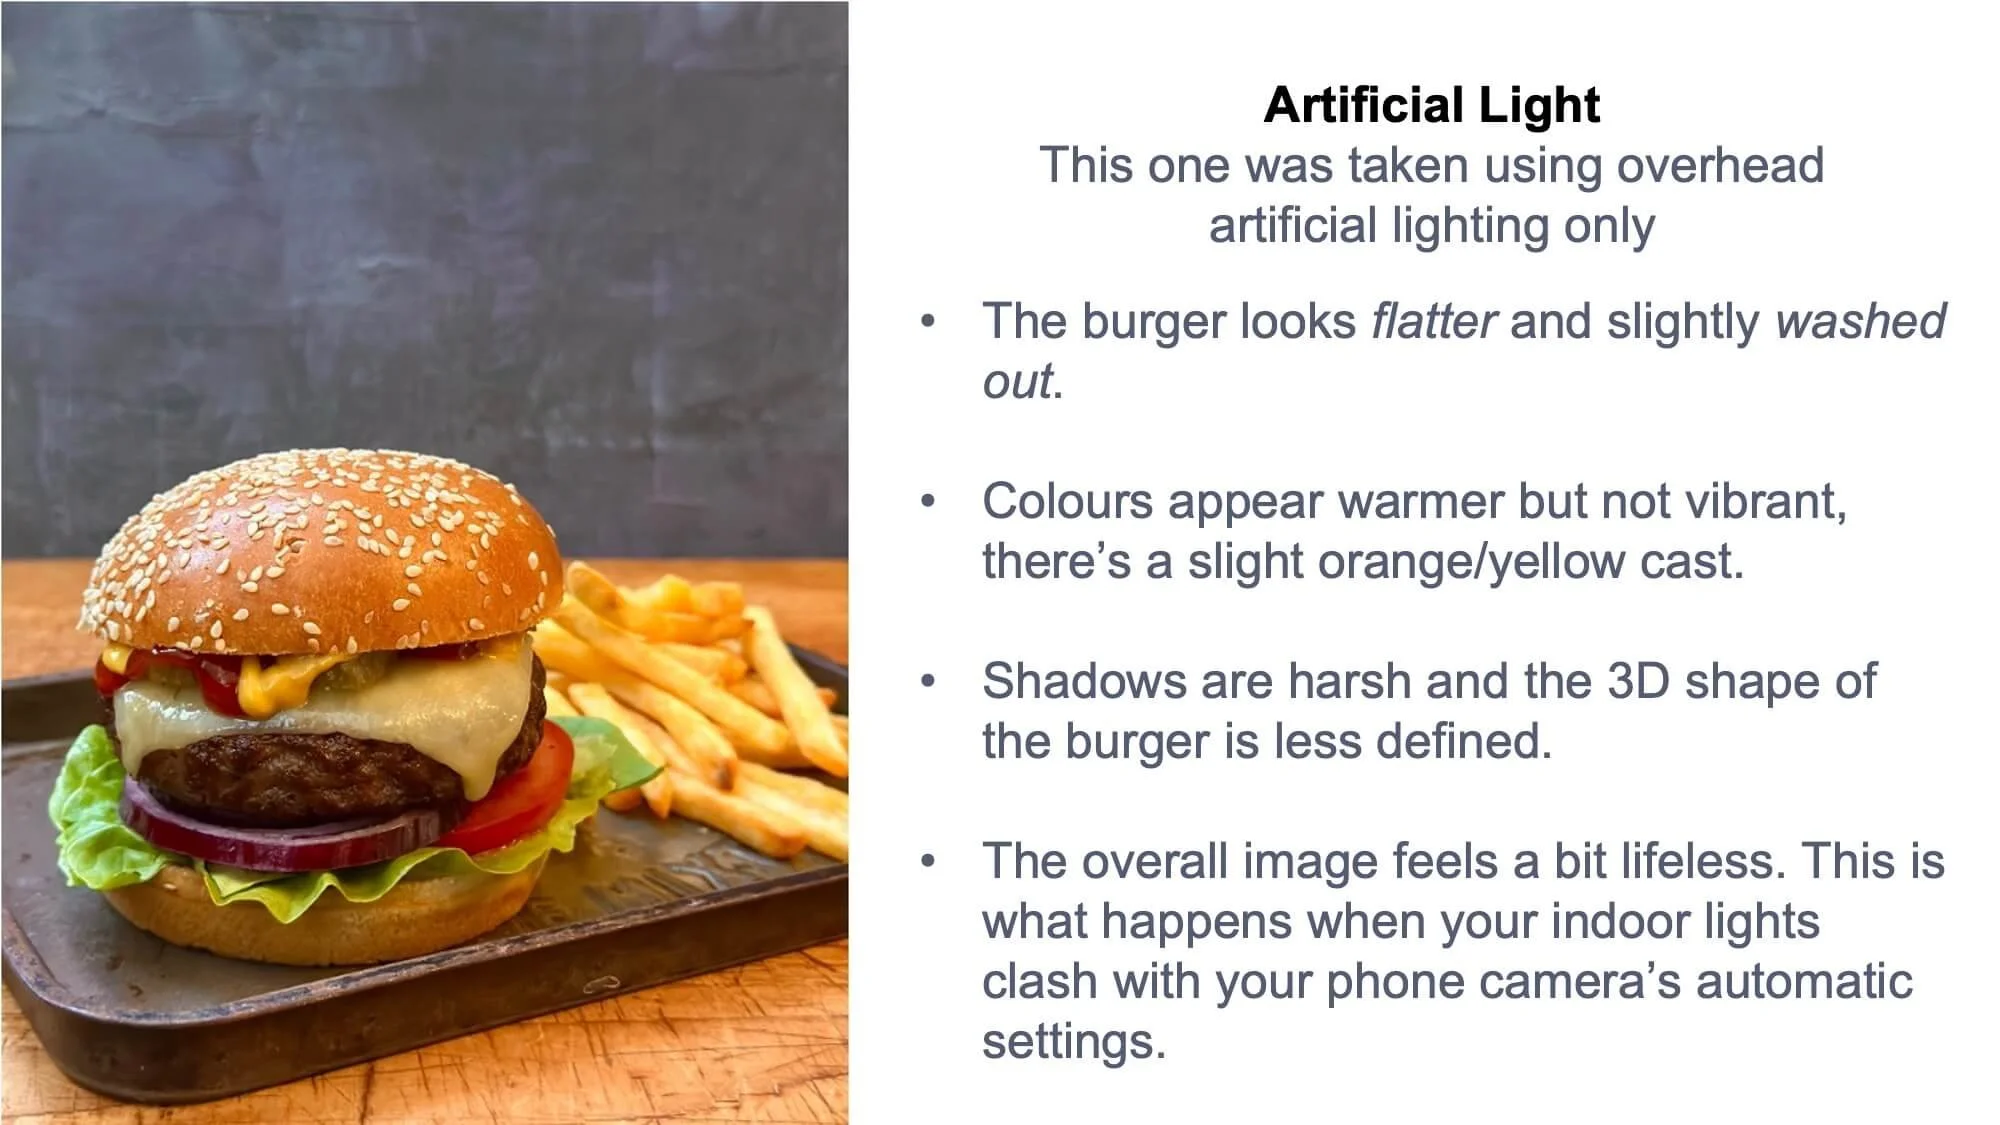
By contrast, indoor artificial light (from spotlights, overheads, or lamps) often casts yellow, green, or blue tints and creates strange reflections. Mixing natural and artificial light can flatten your image entirely and can be a disaster.
If there’s one thing I always say when teaching: you don’t need a studio. You just need to know where to photograph your food and stand.

Here Are My 3 Go-To Tips for Natural Light
1. Turn Off All Artificial Lighting
Before you even tap your camera screen, switch off every indoor light around you. That includes overhead spotlights, fluorescent bulbs, and lamps even in the background. These mix with daylight and can distort colour balance.
Let the window do all the work. Your phone camera will thank you for it and your food will instantly look more natural, appetising, and professional.

2. Find a Window with Soft, Indirect Light
Set up next to window that gives soft light, think of the light you get on a cloudy day. In the UK and across much of Europe, north-facing windows offer ideal soft light. In the Southern Hemisphere, south-facing windows are your go-to. In sunnier regions worldwide, early morning or late afternoon light from east or west often works best.
The real secret? Find consistent, indirect natural light as it gives the most consistent, diffused light throughout the day. Avoid direct sunbeams, they can be harsh and unflattering and difficult to master, you want to aim for gentle daylight.
Soft natural light creates a flattering glow on your food, no harsh lines or blown-out highlights. It’s clean, simple, and beautifully effective.
One thing I see all the time when teaching is that people overestimate how much light they need. I often hear, “Oh, it’s cloudy today, I don’t think we’ll get good photos.” But that’s the perfect weather! Soft, cloudy light is a dream for food photography it’s already diffused, which gives you beautifully even lighting without harsh shadows. You don’t need bright, sunny windows or fancy light setups. In fact, it’s often easier to manage light on an overcast day.
Remember, you’re not trying to become a professional food photographer you just want to create content that looks great and tells your food story. And these small, simple tweaks can help your photos go from flat to fabulous.

3. Use Side Light to Add Shape and Texture
Side lighting is my go-to for most of my shoots and it’s the technique I’ve chosen for this burger feature, not just because it brings out texture it also helps to give your food a three-dimensional feel, but because it’s so versatile.
Yes, it works brilliantly for burgers and anything stacked or three-dimensional as it enhances curves, adds contrast, and gives a sense of shape and volume. But one of the reasons I love side lighting so much and why I always teach it first - is that it works on almost every type of food.
From cakes to curries, flatbreads to salads, side lighting helps create dimension and mood without overcomplicating your setup. It’s reliable, repeatable, and once you understand how to position your subject and where the light’s coming from, you’ll be able to shoot so much more confidently.
Mastering this one lighting technique will open the door to better results across all your food content and it’s why I’ve made it the core focus of this article.
But how do you actually set it up?
Quick Setup: How to Position for Side Lighting
Step1: Place your table or surface next to a window - ideally where you get soft, indirect natural light.
Step2: Position your food so the window is to one side - left or right, depending on your space and light source.

Step 3: Stand or sit so the window is also to your side - that way, the light hits the food from the side, and you photograph it straight on, with the window out of frame.

Step 4: Rotate / move your plate slightly if needed - this helps you control shadows and highlights, so you can shape the image exactly how you want it.
Step 5: Add a Touch of Fill Light By Using A Reflector - If one side of your dish is looking a little too shadowy, try bouncing some light back in with a simple white napkin or piece of card. No fancy reflectors needed!

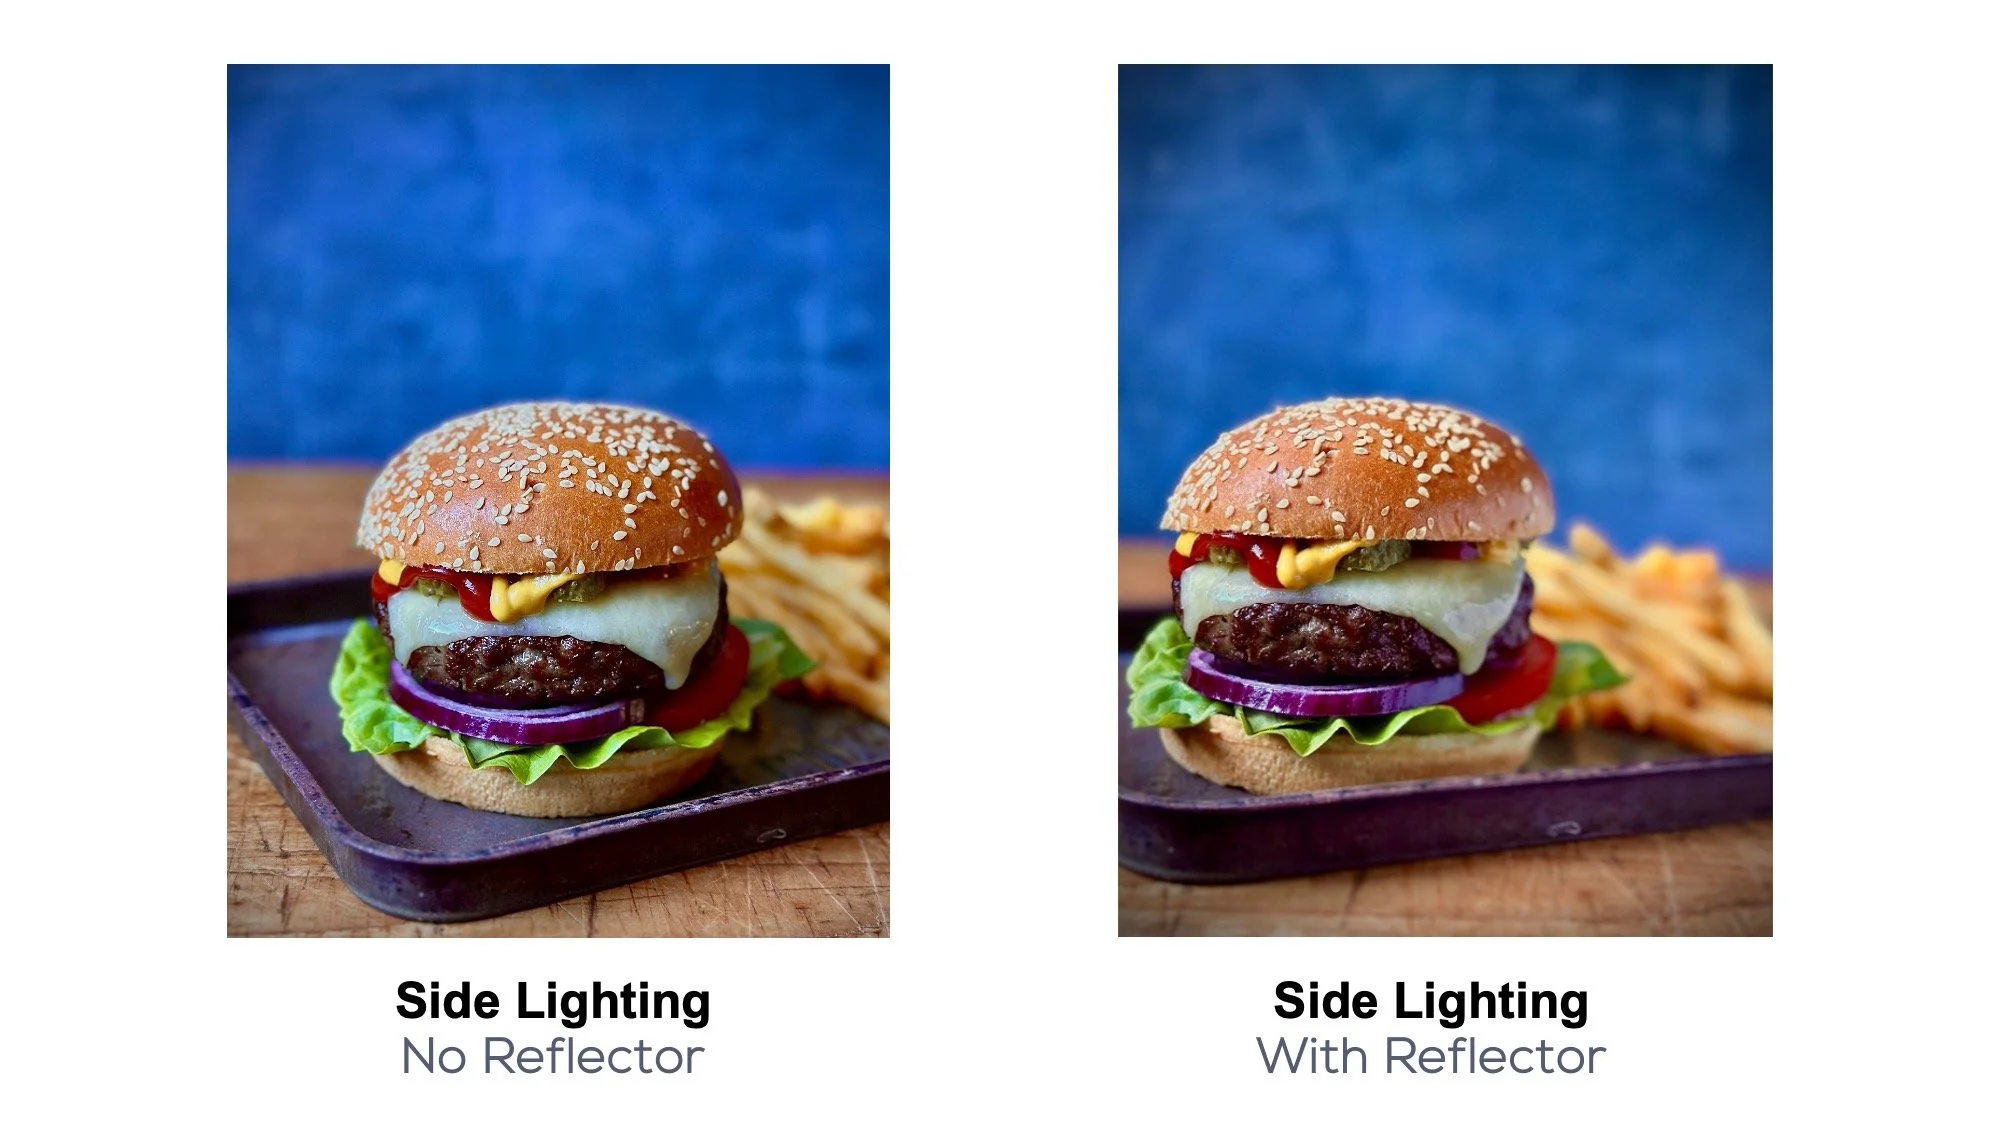
As you can see in the two images above, I’ve used the exact same setup, same burger, same tray, same light source. The only difference? A simple DIY reflector.
Left Image: Side Lighting – No Reflector
Without a reflector, the light hits one side of the burger beautifully, but the opposite side falls into shadow. It still works, it’s moody and dimensional, but you lose a bit of detail in the bun, the patty, and the fries.
Right Image: Side Lighting With Reflector
By adding a piece of white card opposite the window, I was able to softly bounce light back onto the shadowed side. Instantly, the burger feels more “lit all around” brighter, crisper, and more inviting. The ketchup glistens, the sesame seeds pop, and the texture of the bun and lettuce is far more defined.
Why This Works
Using a reflector doesn’t remove all shadows and that’s the key! It simply softens them. You still get shape and depth, but with a more balanced, polished look.
There’s no right or wrong it depends on the mood you want to create. Sometimes I love those darker, moodier shadows for drama. Other times, especially when shooting for brands or menus, I want a clean, commercial look. Using a reflector gives me flexibility to dial that light in however I need.
Using classic soft side light will give your food photos a natural 3D effect, with just enough depth and texture to make the food pop. So give it a try!
Big thanks to my sister Mandy (she’s a food stylist) who made the burger for this shoot. My brief for her was to make it feel rustic and homemade.
Want to See It In Action?
Want to see what that looks like in practice? I’ve shared a video of the full setup on Instagram see how the light shifts and what it looks like in real time! @iphonefoodphotography
Build On What You’ve Learned
Remember, this series is designed to build step-by-step, one core skill at a time. If you’ve already read Part 1 you’ll know how to:
Lock focus and exposure (essential when light levels change)
Adjust brightness manually
Use portrait mode for shallow depth of field
In other words, lighting won’t work by itself - it pairs best with control and intention. Once you know what your phone can do (and you stop letting it choose for you), you’ll be in full creative control.
Next Up: Composition
In Part 3, we’ll move on to composition: where to place your food, how to guide the viewer’s eye, and how to create scroll-stopping images by using simple, classic rules (with a few cheeky tricks).
If you’ve ever wondered why some shots look instantly more “professional” than others it’s probably composition. And I’ll show you how to master it without overthinking or over-styling.
Thanks for reading and remember, the best light is the one you already have access to.
Now go find your window… and choose a burger recipe!
Rupa

More ckbk features

Our 7-part guide to taking better pictures of your culinary creations kicks off with a guide to the basics of your phone’s camera settings

Rupa’s course moves on to composition— “the way you frame and arrange your food to guide your viewer’s eye and create real visual impact”

Clare Heal on why she loves these salty-sour Middle Eastern marvels
Advertisement