Advertisement
Food photography with Rupa: Part 1 – iPhone Settings & Setup
7 May 2025 · Education

Hi, I’m Rupa
I’m a professional food and lifestyle photographer, content creation educator, and founder of Your Creative Vision. I’m based in London, and I teach foodies, chefs, bakers, restaurateurs, and food entrepreneurs all over the world how to create beautiful, scroll-stopping content using just their phones—no fancy camera needed.
Over the next few months, I’ll be sharing with ckbk a series of bite-sized tips from my upcoming online course, “7 Steps to Standout Food Content” a simple approach that will help you photograph food more confidently, consistently, and creatively, whether you are doing so for work or just for fun!
Each feature will focus on one of the seven foundations of great food photography and video. Whether you’re capturing a dish you’ve just plated or showcasing your signature bake, you’ll get results—fast.
While I teach primarily using iPhones (because I know them inside out!), most of these techniques work just as well on Android devices—the names of some settings may vary, but the core principles stay the same.
If you'd like to learn more about what I do, see what goes on behind the scenes at my shoots, and pick up even more tips, tricks, and foodie inspiration, come say Hi on Instagram at @iphonefoodphotography. That’s where I share tutorials, mini-trainings, and plenty of tasty content—all shot using just my iPhone.
You don’t need any fancy kit to take great food photos, just a few smart tips and tricks, the confidence to try, and the intention to create. So grab your phone, roll up your sleeves, and let’s make your food look as good as it tastes.
Rupa
Food Photography with Rupa
Simple tricks to make your hero dish shine.

This Month’s Focus: iPhone Settings & Setup
I always say: “you” make the photo, not your phone. When you learn to control the phone, not let it control you, that’s when the magic happens. Understanding the settings and how to use them with intention, those great shots won’t just be lucky one-offs, they’ll become consistent, repeatable, and creative.
Whether you're plating up a Mother’s Day spread, a fresh spring salad, or your signature dish, these 3 quick iPhone tips will help you capture food that looks as good as it tastes.

1. Wipe Your Lens Before You Shoot
It sounds obvious, but it’s one of the most overlooked steps and it makes a huge difference.
Before you take any photos or videos, give your phone lens a quick clean. Use a soft or microfibre cloth (never anything rough that could scratch).
Why it matters:
In food photography, we’re often working around steam, flour, oil, sauce and touching our phones with messy hands. That leaves smudges and condensation, which can make your photos look hazy and dull.
Clean lens = clear, sharp images.
Make it a habit — wipe your lens before every shoot!

2. Use Portrait Mode for a Soft, Blurry Background
Instead of using the standard Photo mode, try switching to Portrait Mode. It adds a beautiful soft blur behind your dish, helping it pop out from the background.
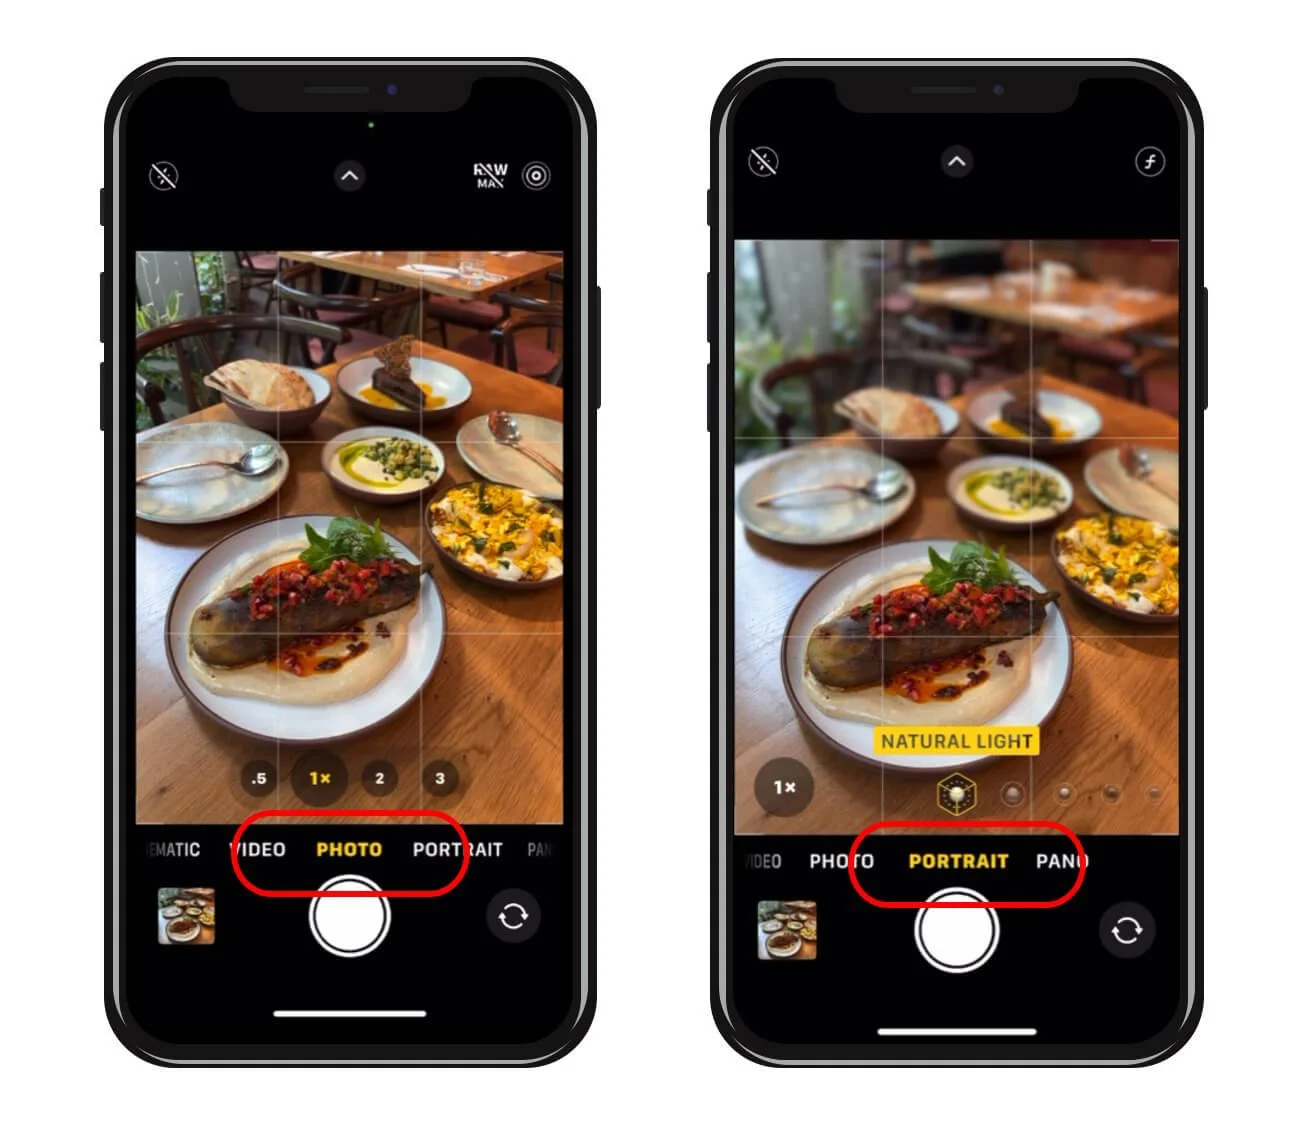
Think of it like casting your main actor - your “hero dish” and letting the extras fade into the background. That beautiful blur keeps the viewer focused where it matters.
The result? Your food looks sharper, more polished, and way more professional perfect for highlighting one key dish among many.

3. Tap + Hold to Lock Exposure and Focus
This is a total game-changer and one that many people don’t even know exists!
Once you’ve framed your hero dish, tap and hold on the screen on your hero dish until you see a square appear, and then the AE/AF LOCK. Now your iPhone has locked in the focus and brightness settings.

What’s focus?
Focus is what’s sharp and clear in your photo; it's where your viewer’s eyes are drawn first.
By locking focus, you’re telling your iPhone:
“Keep this part of the image crisp, clear, and in control.”
Even if you move slightly or the light changes, your subject will stay sharp — as long as AE/AF Lock is active.
Important: Every time you reframe or move your phone and go to take another shot, check your focus again. If you’ve lost the lock, just tap and hold on your subject to re-lock it.
Pro Tips
Reframe before locking focus
Move your phone gently to avoid losing the lock
If AE/AF LOCK disappears, tap and hold again - easy!
Want to control brightness?
Once you’ve locked focus, you can adjust the brightness manually.
Just swipe your finger up or down on the screen:
Swipe up = brighter
Swipe down = darker
You’ll see a little 🔆 icon appear—this moves up or down as you swipe, showing how much light you’re adding or reducing. It’s a simple but powerful way to add mood, drama, or clarity to your shot before you even press the shutter.

Once you’ve focused and adjusted the brightness, all that’s left to do is press the shutter and away you go!
You’ve just taken full control of your phone, and that’s when the magic really starts.
Android Users — What to Look For:
Portrait Mode: Look for Live Focus, Portrait, or Background Blur
Focus Lock: Tap and hold on your subject
Exposure: Swipe up/down to adjust brightness near the focus box
Features may differ by model, but most Android phones offer similar tools.
My Personal Philosophy
When I trained in photography (pre-digital!), we had to get it right in-camera because there was no “fix it later.” Editing happened in the darkroom, and mistakes were expensive and time-consuming.
That’s why, to this day, I believe:
Editing is like a garnish - it should enhance the dish, not cover up or fix mistakes.
Learning to control your phone’s focus and exposure gives you creative freedom, consistent results, and the confidence to shoot with intention - not guesswork.

Next Time: The Power of Lighting
In the next feature, we dive into lighting. This is the cornerstone of all food photography and video. It’s one of the most important foundations, and learning to master it will completely transform how your food looks on camera.
If you’ve ever struggled with flat or dull images, or wondered why your photos don’t “pop,” this is the game-changing skill to focus on. And I can’t wait to guide you through it step by step!
Bonus Tips
I’ve shared two more quick tricks over on my Instagram @iphonefoodphotography—including how to use gridlines and what to do if you don’t have a tripod (what other everyday household things can you use?)
About this Shoot
The photos in this piece were all taken at The Mallow, a beautiful vegan restaurant in London, using just an iPhone 14 Pro Max and some natural light. It’s proof that you don’t need fancy equipment, just a little know-how, great food, and your phone.

More ckbk features

Keep the recipes you need available in an instant using our new pinned recipe feature!

Clare Heal on why she loves these salty-sour Middle Eastern marvels

An interview with the Chair of the Guild of Food Writers, whose two cookbooks offer endless uses for staples from cupboard and freezer
Advertisement